 OperationOperation
The Camouflage plug-in is rather easy to use so operation should be pretty much self-explanatory. This section will therefore only serve as an overview to get you going.
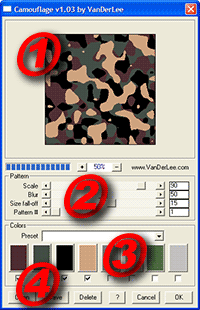
The screenshot shown on the right is the window you'll see when starting the plug-in, it contains a few sections, labeled with the red digits, which will be described in sequence.
If you're familiar with our other plug-ins, you'll know how to
use the preview window.
On top is the big preview window, if the image doesn't fit into the
preview area, you can pan it around by clicking the left mouse
button anywhere on the image and dragging whilst keeping the button
pressed.
Beneath the preview is the progress indicator and the zoom buttons
which will let you either zoom in or out of the image.
These four controls determine the shape and size of the effect.
From top to bottom they are;
Scale, used to set the size (and consequently, the amount) of the
spots, setting this value too low may produce faulty results on
small images (either width or height less then 105 pixels) or small
zoom levels.
Blur, controls how "rough" the spots appear to be, setting this
value too low will show a lot of speckle whereas too high a setting
will make the effect look like blobs.
Size fall-off, The fall-off will determine how the size of the
spots relative to each other should be. Please note that the
fall-off is relative to the first color, not the background. You
could set both the background color as the first color to the same
color and use three colors if you require falloff control over a
bi-color pattern.
Changing the pattern # will change the pattern itself in a random
way. As with all controls, the random setting can be saved and will
produce identical results each and every time.
These eight boxes show the colors used in the pattern. Colors
are applied from the back to the front starting with the leftmost
color defined.
Clicking on any of the color boxes will allow you to change it's
color by using a standard color dialog.
Clicking the checkboxes will tell Camouflage to use that color for
a layer. Logically you are not able to select only one layer, two
is the minimum. The background layer is always selected and it's
checkbox cannot be switched off.The Camouflage plug-in contains a
range of well-known and lesser-known camouflage pattern ranging
from WW2 to modern palettes. These colors are based on actual
camouflage patterns used in real life and will prove useful if you
want realism. Due to the sheer amount of camouflage patterns used
in real-life we've had to make a selection which we believe is both
varied and accurate enough.
There's also a few animal camouflage patterns included.
As a small note; if you're looking for the well-known "Arctic Snow"
army pattern, we've left it out because it's simply plain
white.
The Open and Save buttons allow you to save and restore any
settings you have made. Clicking either button will show a
corresponding window allowing you to open or save settings. The
default extension for these settings files is .cfs, it will be
added automatically if you do not specify it manually. The format
used for saving the files is extensible so future updates of
Camouflage will be able to use them.
There is also a Delete button if you wish to remove a settings
file.
The two buttons on the right hardly require explanation; the OK
button will render the effect to the source image, the Cancel
button will return to the host application without any changes to
the image.
Left are the Help button, which you have already discovered seeing
as you're reading the help system now and a link to our site hidden
under the copyright-notice, just click it and you're favorite
browser will be launched automatically.