 OperationOperation
If you're familiar with our other plug-ins, you'll know how to
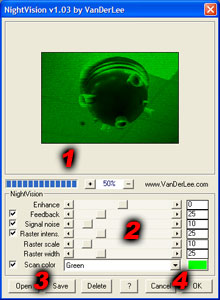
use the preview window.
On top is the big preview window, if the image doesn't fit into the
space reserved for it you can pan it around by clicking the left
mouse button anywhere on the image and dragging whilst keeping the
button pressed.
Beneath the preview is the progress indicator and the zoom buttons
which will let you either zoom in or out of the image.
The enhance feature allows you to brighten (or darken if you
require to do so) the source image. Normally the enhance feature
just re-scales the intensity information of the source image, but
if a part of the image becomes brighter than 100%, the overlighting
system kicks in.
The overlighting system is only visible when using a scan color; if
the re-scaled color becomes brighter than the scan color, the
overlighting system goes beyond the scan colors maximum brightness
towards white. Note that this is not the same as simply
re-scaling.
If you don't want any enhancement, just uncheck the checkbox on the
left side.
Feedback will let brighter colors fade away slowly from left to
right when the color to the right is darker, this effect
realistically simulates how feedback is formed in normal hardware.
The effect can be set between a very small feedback to eternal
feedback, in which the signal never fades away.
If you don't want any feedback, just uncheck the checkbox on the
left side.
This setting adds a random noise to the image after being
enhanced but before the feedback or raster effects are created.
This allows you to have the feedback "see" the signal noise.
If you don't want any signal noise, just uncheck the checkbox on
the left side.
The raster feature adds an interlacing to the image, where
certain horizontal lines are darkened systematically. Setting the
intensity will let you control how much darker these lines should
be (by percentage), the scale sets the distance between these lines
and the width sets the amount of consecutive lines to be darkened
as a percentage of the scale.
The raster is completely anti-aliassed, meaning the raster lines do
not need to correspond to actual image pixels but can be in-between
instead, the raster effect will correctly shade these lines to look
like "half" lines.
If you don't want any raster lines, just uncheck the checkbox on
the left side.
This box shows the colors used for the scanning.
Clicking on any of the color boxes will allow you to change it's
color by using a standard color dialog, alternatively you can
select the hosts' foreground or background color from by selecting
them from the list.
The Open and Save buttons allow you to save and restore any
settings you have made. Clicking either button will show a
corresponding window allowing you to open or save settings. The
default extension for these settings files is .nvs, it will be
added automatically if you do not specify it manually. The format
used for saving the files is extensible so future updates of
NightVision will be able to use them.
The Delete button allows you to select previously saved settings
and remove them from disk.
These two buttons hardly require explanation; the OK button will
render the effect to the source image, the Cancel button will
return to the host application without any changes to the
image.
While the image is rendering, you will see a progress bar which
indicates the amount of rendering completed and the time left.
At the top-right of the screen you can find the help button, which will show you the help information you are reading now, if you click on the small VanDerLee copyright notice below the open and save buttons, your browser will be started and will be directed to our www.vanderlee.com site.