Snowflakes
 Although the controls in the
Snowflakes plug-in are rather straightforward, especially when
you're familiar with our other plug-ins, some details may not be
immediately clear. This section will guide you through all the
basics and secrets of the Snowflakes plug-in.
Although the controls in the
Snowflakes plug-in are rather straightforward, especially when
you're familiar with our other plug-ins, some details may not be
immediately clear. This section will guide you through all the
basics and secrets of the Snowflakes plug-in.
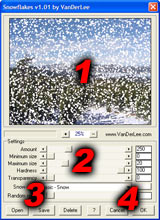
The screenshot on the right shows the plug-ins' user
interface.
We've marked the main sections, for which you will find a complete
explanation in sequence.
1. Preview
On top is the big preview window, if the image doesn't fit into
the space reserved for it you can pan it around by clicking the
left mouse button anywhere on the image and dragging whilst keeping
the button pressed.
Beneath the preview is the progress indicator and the zoom buttons
which will let you either zoom in or out of the image. The preview
is as accurate as possible and will even be reliable at the
smallest scale.
2. Effect controls
These three controls determine the amount of snowflakes, their
sizes, color and other properties. From top to bottom they
are...
 Amount
Controls the amount of snowflakes
on screen. You can specify anything between 0% and 1000%, usually
you'll want a relatively low percentage (between 10% and 250%) but
you may have to resort to a higher snowflake amount when using
small snowflakes, high transparency or for specific effects such as
clouds or fog.
 Size range
begin/end
Size range
begin/end
The size range controls allow you to set the
minimum and maximum size of the snowflakes so the effect will get a
3D feel. Both controls can be interchanged; the actual range start
from the lowest of the two and ends at the highest. If you set both
controls to the same size, each snowflake will have equal size,
which is useful for effects like clouds or fog.
 Hardness
If you're familiar with the
brushes in PhotoShop, you'll know how to use the hardness control,
since it works precisely the same. Hardness controls the edges of
the snowflakes, the lowest setting will turn them into a blurred
dot whereas the highest setting will produce perfectly
anti-aliassed circles.
For natural snowflakes we recommend using a value of about 50%,
fluffy clouds look best with a very low hardness value.
 Transparency
Transparency controls how
whether the snowflakes appear completely opaque (0%) or completely
transparent (100%). The transparency mixes smoothly with any
background you might have, including partially transparent
ones.
For an average snowflake either use no transparency at all or just
slightly. Raindrops can be simulated by using a medium transparency
and fog or clouds work best with nearly complete transparency,
about 95% to 99% will produce good results.
 Color
Color
The color of the snowflakes can also
be changed to allow for many other types of effects like gold dust
or confetti. To make live easier, we've included a carefully chosen
collection of predefined colors, which you can select from a list
by clicking on text-box. Alternatively you can choose to specify
your own color by clicking on the color-preview box. A standard
color selection window will help you pick the color you need.
Random seed
Changing the random seed will
change the random pattern used for placing and sizing the
snowflakes. The reason this is set manually is so you can save the
current setting, open the saved setting at a later time and end up
with identical results. It also ensures the same random
distribution on consecutive renders.
You can specify a seed from 0 to 9999, which should give you enough
options to last at least a few years.
3. Open/Save/Delete
The Open and Save buttons allow you to save and restore any
settings you have made. Clicking either button will show a
corresponding window allowing you to open or save settings. The
default extension for these settings files is .sfs, it will be
added automatically if you do not specify it manually. The format
used for saving the files is extensible so future updates of
Snowflakes will be able to use them.
The Delete button allows you to select previously saved settings
and remove them from disk.
4. OK/Cancel
These two buttons hardly require explanation; the OK button will
render the effect to the source image, the Cancel button will
return to the host application without any changes to the
image.
Other controls
The button labeled with the question mark ("?") opens the help,
which you are reading now.
Clicking on the URL beneath the preview will open a browser to our
site.
Copyright © 2001-2006 Martijn W. van der Lee/VanDerLee.