 Using the preview
 Using the preview
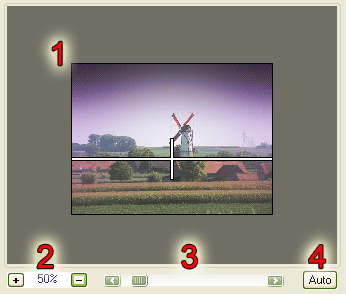
The preview will show you what the final effect will look like, scaled to fit the display.
FilterOptix' preview (1) is
primarily meant to see what the filter will look like after being
applied to the image, it is not intended to show the absolute
result.
Although the preview result will be mostly indistinguishable from
the final result there are some differences.
Optionally, a crosshair line can be drawn on the preview to better help position the filter in situations where the effect is smooth or highly blurred. The crosshair will not be drawn on the final image.
Zooming in too much will make the preview slower. It's best to keep the entire picture visible at all times.
The preview can be changed in scale. By default, the preview will scale to the biggest size that will fit the window, but you can change the zoom by using any of the zoom controls;
When zooming in, you may have a preview that is bigger than can be shown inside the window. If this happens, you can see different parts of the preview by dragging it around. To drag the preview, simply click and hold the mousebutton and move the mouse around.
 Window size
If you want a larger preview area, you can resize the window by
clicking and dragging the size grip at the bottom-right of the
window.
You can also resize the window by clicking and dragging any of the
borders and move the window by clicking and dragging the title bar
of the window.
FilterOptix will remember the window position and size the next
time you use it.