Effects - ColorEffects - Color
Applies a single color or color gradient filter effect. Many different types of gradient, color mode can be used and varying levels of transparency can be applied.
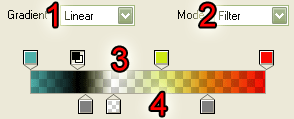
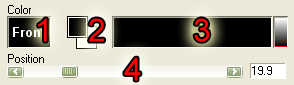
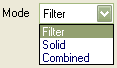
(1) Sets the gradient mode used for this effect. See below for details.
(2) Sets the color mode used for this effect. See below for details.
The gradient bar shows a horizontal representation of the
gradient used for this Color effect. It works similar to gradient
tools in graphics applications.
In the middle is the bar and at both the top and bottom are
"points".
Points are small squares with two lines indicating the exact position on the gradient. Points tell the gradient where to change color or transparency and the details of what to set the color or transparency to.
There are two types of points, color points (above the gradient (3)) and transparency points (below the gradient (4)). Each set of points always has at least one point.
Points can be selected (by clicking on a point), moved (by holding the mouse button and dragging), reordered (by moving a point to the other side of another point), created (by clicking next to an already existing point or deleted (by moving the point away from the gradient). All these changes are reflected in the gradient and preview whilst you are making them.
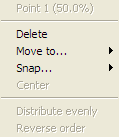 You can also click the right mouse
button to quickly rearrange points. Depending on which point you
click the right mouse button and the number of points in a set, any
of the following options may be available:
You can also click the right mouse
button to quickly rearrange points. Depending on which point you
click the right mouse button and the number of points in a set, any
of the following options may be available:
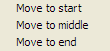 Move to start - Move the
point to the left-most position in the gradient.
Move to start - Move the
point to the left-most position in the gradient.If you select any point, a number of additional controls will appear. The set of controls depends on whether you've selected a color or transparency point.
 Color points determine the position
of color changes in the gradient.
Color points determine the position
of color changes in the gradient.
You can choose any color you want or the "front" and "back" colors.
By selecting the front or back color, the gradient will replace
that color with the current front and back (a.k.a. foreground and
background) colors of the graphics application. This way you can
quickly adapt the colors of complex filters from the host and use
FilterOptix more efficiently.
(1) Shows the currently selected
color. If you are using the front or back color, this control will
show the text "Front" or "Back" respectively.
If you click on this control, a window identical to that of your
graphics application will appear in which you can change the
color.
(2) Click on the top-left box to select the front color. Click on the bottom-left (partially covered) box to select the back color.
(3) This control lets you quickly select a color from a gradient. It consists of two parts, on the left is the "shade" selector; just click anywhere to select the color under the mouse pointer. On the right is the "light" selector; click anywhere to select the color under the mouse pointer. The shade and light selectors work together in that the colors available in one depends on the color selected with the other (or the current color of this point).
(4) Changes the position of this point. Use this if you want to set the position of a point more precisely than you can do my dragging the points on the gradient.
![]() Transparency points determine
the position of transparency changes in the gradient.
Transparency points determine
the position of transparency changes in the gradient.
Changes the amount of transparency for this point. Ranging from 0% (fully opaque; no see-through at all) to 100% (fully transparent; invisible).
Changes the position of this point. Use this if you want to set the position of a point more precisely than you can do my dragging the points on the gradient.
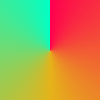
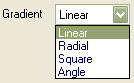 There are a number of modes which
determine the "shape" of the gradient.
There are a number of modes which
determine the "shape" of the gradient.
Note that you can have multiple Color effects in a single filter,
each of which may use a different gradient mode, so you can use a
combination of Linear and Radial modes to create a "sunset"
filter.
|
|
|
|
|
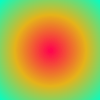
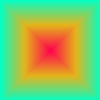
| Linear | Radial | Square | Angle |
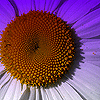
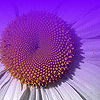
 FilterOptix gives you three
different color modes to choose from. "Filter" is most like a
typical color filter effect whilst "Solid" is more like an
out-of-focus solid color mask. "Combined" mode tries to strike a
balance between the two.
FilterOptix gives you three
different color modes to choose from. "Filter" is most like a
typical color filter effect whilst "Solid" is more like an
out-of-focus solid color mask. "Combined" mode tries to strike a
balance between the two.
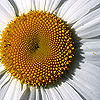
|
|
|
|

|
| Example image | Filter | Solid | Combined |