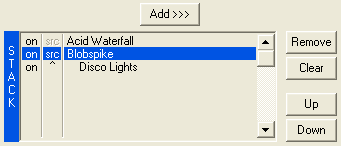
Using the Stack list, you can create complex effect built up of
multiple individual filter effects.
The Stack list is divided in three columns; the leftmost column is
the enable column. The second column is the layer type column. The
third column shows the filter effect name.

The Stack list uses a layers concept similar to Photoshop and other graphics applications. Each filter effect in the Stack list is a layer and, depending on the type of layer it is, will be mixed in different ways with the original image. There are three types of layers:
You can switch between the type of layer (either source or stack, because background layer isn't configured in the Stack list) by clicking on the second column. Alternatively you can also switch layer type by clicking on the filter name with the right mouse button or by holding either of the "Ctrl" keys on the keyboard whilst clicking with the left mouse button. The first (top-most) layer is always a source layer and cannot be changed.
Note! The layers in UnPlugged-X are ordered differently from most graphics applications; the first layer to be rendered is at the top. All subsequent layers are applied on top of the previous layer. In Photoshop, for instance, the first layer is at the bottom of the layers list.
You can enable/disable a single layer (in the case of stack layers) or a source image and all stack layers based on that source layer. Do this by clicking on the leftmost (enable) column in the Stack list. The text "on" will switch to "off". To enable the layer again, just click it again.
The "Add >>>" button at the top will add the currently selected effect (either in the Filter list or the Stack list, in which case a clone would be made) to the Stack list.
The buttons on the right side help you manipulate the Stack list.