This page will teach you how to create your own filters with FilterOptix or change existing ones.
FilterOptix filters are made by combining a number of different
effects.
Effects are basic "building blocks" such as color gradients, masks
or a soft-focus effect.
By combining these, you can get complex and powerful filters like
the real-life analog filters used by photographers and well
beyond.
You can combine up to eight effects into a single filter. Some
effect types can be used more than once in a single filter.
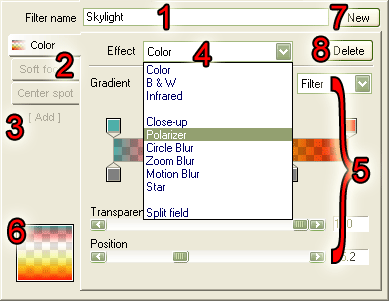
On the top of the edit panel you find the name of the filter
(1). Names can be anything you want,
they don't influence the effect itself and are only used to make it
easier to identify the different filters in the presets. To the
right of the name is the "New" button ![]() (7). Clicking this button starts a new,
default filter.
(7). Clicking this button starts a new,
default filter.
To the left (2) you will see a
number of tabs, each of which represents an individual effect. By
clicking on any one of these tabs, you can edit the settings for
that particular effect. At the bottom of the list of tabs you'll
find a text label "[ Add ]" (3). Click
on this text to add a new effect.
Some of the tabs have small pictures on it; these preview the
effect of that tab only and is used to identify the effect in case
you have multiple similar effect types.
The right part (5) of the Edit panel contains the controls for the effect you are currently editing. The number and type of controls depends on the type of effect. They are all listed and explained in detail in the effect reference chapter of this manual. At the top of this area are the effect selector (4), which is used to select the type of effect you want to use and a "Delete" button (8) to delete effects from the filter.
On the bottom left, below the tabs, is a small preview (6) for convenience.
There are two different types of effects; "normal" effects which
change the picture, for instance a color, soft-focus or color
gradient.
The other type of effect is called a "Mask effect".
Mask effects do not change the picture themselves but influence
how normal effects work.
More specifically, mask effects limit the result of other effects
by determining which part of the pictures may not be changed by
effects.
Mask effects apply only to effects appearing after (or below) the
mask effect and multiple mask effects can be added together (making
the part of the picture that can be changed increasingly
smaller).
Both normal effects and mask effects are influenced by the order
in which they appear..
A mask effect only changes the way effect appearing below it change
the picture.
Similarly, normal effects may also change each other. For instance,
a soft-focus effect after a star effect will also soften the stars
whilst a star effect after a soft-focus effect may make stars
appear on bright, softened areas.
FilterOptix allows you to change the order of effects very
easily.
Just click on the tab button of the effect you want to move to a
different position and, whilst keeping the mouse button pressed,
move it to the position you want.
TThe previews will be updated whilst you're dragging the effect
around so you can immediately see the result.
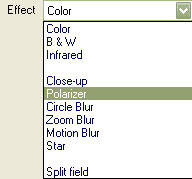 Changing an effect type
To change the type of effect, you use the effect selector.
Click on the white box right next to "Effect" and select any effect
you want to use.
The choice of available effects may depend on which effects you are
already using as some effect (i.e. B & W and Infrared) can only be used
once.
The available choices are grouped in 3 categories; those that deal
with colors, the other normal effects and the mask effects.
Click on the "[ Add ]" text label below the tab buttons to add a
new effect to the filter.
After clicking on the label, the right side of the Edit panel
contains only an effect selector.
Select the type of effect you want, and the new effect will be
created and added to filter.
If you don't select a new effect type, no effect will be added.
There are two ways to delete an effect from the
filter.![]()
A reference of all the available effects and how to use their settings can be found here:
You can add your self-made filters to the presets in a number of
ways.
To learn how to manage presets, read the following tutorial: