On this page you'll learn how to manage and organize presets.
FilterOptix comes with a wide range of presets; previously created filters. The presets are used for convenient access to the large number of possible filters that can be created with FilterOptix. Besides using the provided presets, you can also add your own presets, delete presets you don't need, move presets around so they appear in a convenient order.
By default, FilterOptix automatically remembers the current set of presets so every time you start FilterOptix, you have your own set of presets. You can also store sets of presets to file so you can use multiple sets for different purposes or share them with other users.
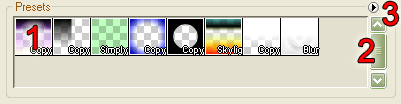
The preset area is located to the top-right of the FilterOptix
window.
The preset area contains a number of boxes (1), each of which represents a single preset.
To the right of the area is a scrollbar (2). If there are more presets than can be shown in
the area, you can use the scrollbar to scroll through all the
presets.
At the top-right is a button ![]() (3) called the "Preset file menu"
button. This button is used to store sets of presets to file.
(3) called the "Preset file menu"
button. This button is used to store sets of presets to file.
Selecting a preset is as easy as simply clicking on the preset you want to use.
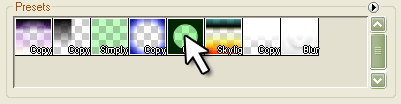
You may want to have the presets appear in a different order, especially when you start adding your own presets. Luckily, moving presets around is very simple.
Click on the preset box you want to move and keep the left mouse button pressed. The preset will be marked with a transparent color. Whilst keeping the mouse button pressed, move your mouse pointer (and the preset!) to it's new location. The preset area will change whilst your doing this to reflect the change. When you are happy with the presets' new location, let go of the mouse button.
You can add your own filters, created in the Edit tab, by clicking on the right mouse button anywhere in the preset area. A pop-up menu will appear, with the full preset name at the top, giving the following options:
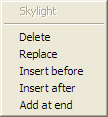 Delete (only when mouse pointer is over a
preset)
Delete (only when mouse pointer is over a
preset)If you don't want to select any of the options, just click anywhere outside the menu.
Entire sets of presets can be stored in files. You can use this
to share presets with others or maintain multiple sets of
presets.
To use preset files, right click on the ![]() Preset
file menu button at the top-right of the presets area (3). A menu will appear like the one shown here.
Preset
file menu button at the top-right of the presets area (3). A menu will appear like the one shown here.
From the preset file menu, you can select any of the following
options:
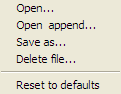 "Open..."
If you don't want to select any of the options, just click anywhere outside the menu.
FilterOptix preset files use the .fop file extension.
Preset files are plain text files, experienced computer users may
be able to edit the files manually, but no warranty or support is
provided for manually edited preset files.
There are a number of options which affect the look and feel of the presets area. These are:
You can learn more about these, and other, options by reading the "How to change options" tutorial or the options reference.