 Starting FilterOptix
If you have a registered FilterOptix, make sure to register first: How to register
This tutorial explains the basic of using FilterOptix. After reading this tutorial you will be able to use predefined filters on your pictures.
Starting FilterOptixTo start FilterOptix, you must open or create
a picture in RGB, grayscale or duotone color mode in 8-bit or
16-bit color depth.
A JPEG image is always a good place to start. Not all graphics
applications will support all color modes and color depths but RGB
color mode and 8-bit color depth is usable for all supported
graphics applications.
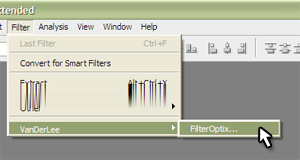
How to FilterOptix depends on which graphics application you're using. Pictured here is Photoshop. Most graphics applications will have a menu or submenu labeled "Filter(s)" and in it you'll find the "FilterOptix" option in the "VanDerLee" category.
After starting FilterOptix, you'll see the following window.
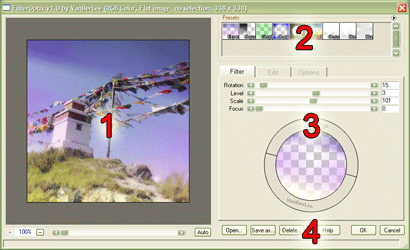
This window contains everything you need to control FilterOptix. The window is divided into a number of different areas, labeled in the picture with red numbers.
![]()
Only three tabs are pictured though a fourth (labeled "Register") may appear if you are not yet registered, after registration this tab will disappear.
![]() At the bottom of the window is also a
toolbar which may at times display useful information.
At the bottom of the window is also a
toolbar which may at times display useful information.
While making the preview, the toolbar shows a progress bar which
will disappear again after the preview is finished.
 The first time
you start FilterOptix, a default filter will be loaded by default.
You can see this filter in the preview.
The first time
you start FilterOptix, a default filter will be loaded by default.
You can see this filter in the preview.
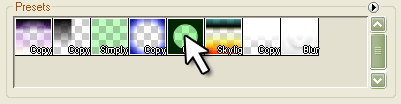
You'll probably want to use another filter though. FilterOptix
comes with a large number of predefined filters, called "presets". You can find these
presets at the top-right part of the window.
The presets are order in a grid, with each preset having a small thumbnail preview of the effect. To select a preset, clic anywhere on the square thumbnail of the preset you want to use. If you can't find the filter you want, you can use the scrollbar at the right side of the presets to scroll through all filters.
The preset thumbnails also contain a short abbreviation of their names at the bottom-right of each thumbnail and if you hover over a thumbnail you will see the full name of the preset at the bottom of the window, in the status bar.
Later on you will learn how to manage the presets; adding new presets, removing presets, re-ordering, adding presets created by others and sharing your own presets.
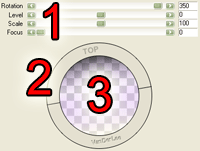 Now you can
change a few aspects of the filter that specifically for the
picture you are working on. These are called the "Filter settings" and
can be found in the Filters tab. This is somewhat similar to
real-life; if you see the "presets" in FilterOptix as being the
filters you attach to the lens of your photo camera, the filter
settings are basic manipulations like the rotation of the filter
and the level of movement (when using a modular system in
real-life).
Now you can
change a few aspects of the filter that specifically for the
picture you are working on. These are called the "Filter settings" and
can be found in the Filters tab. This is somewhat similar to
real-life; if you see the "presets" in FilterOptix as being the
filters you attach to the lens of your photo camera, the filter
settings are basic manipulations like the rotation of the filter
and the level of movement (when using a modular system in
real-life).
The following In FilterOptix you can control the following filter settings:
You can do this using the sliders (1), the outside of the dial (2) to change rotation and the inside (3) to change the level.
Now press the ![]() button and the filter will be
rendered to the picture. It may take a while depending on the
complexity of the filter and the size of the picture but will
generally finish in a number of seconds. If it takes longer, you
will see a progress bar which accurately indicates how much time
lasts.
button and the filter will be
rendered to the picture. It may take a while depending on the
complexity of the filter and the size of the picture but will
generally finish in a number of seconds. If it takes longer, you
will see a progress bar which accurately indicates how much time
lasts.